Enhancing grey teal populations using nest boxes.
Grey teal nest boxes have been used for more than 40 years with considerable success in New Zealand. The history of the nest box programme is reviewed and the future is also considered. The article covers a number of newly adapted but not widely known ideas, including capturing and banding nesting grey teal. If you are managing a grey teal nest box site, this is the current go-to document to get the very best results.
Please select link to go directly to information:
Background
What can you do
Best locations for nest boxes
Best practice nest box dimensions
Securing the removable lid
Mounting the box over water
Numbering nest boxes
Annual servicing
Pest and predators
Persistence pays off
Permits
Myna & Starlings
Breeding grey teal
When they've hatched
Research
Banding
Background
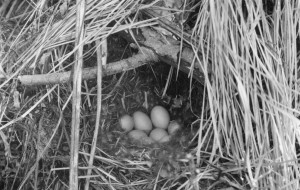
Above: First known grey teal nest Pike’s Lagoon, Gladstone, NZ, 1944.
Grey teal are considered “a recent invader from Australia” (Williams 1964).
Examination of bones found in Maori middens and fossil sites show that grey teal, (when correctly identified), have always been rare in NZ.
The Royal Society of New Zealand noted in 1876 that grey teal were: “accidentally observed as stragglers in New Zealand being quite peculiar to the Australian continent.” The Wanganui Museum, that for some years sought a specimen for display, also labelled the bird an “Australian vagrant,” and noted in 1900 that in New Zealand it was “very rare and will soon, unfortunately, be extinct.”
Robert Stidolph writing in Emu in 1944 stated: “The grey teal in New Zealand hasalways been regarded as a rare bird.” He noted that Sir Walter Buller obtained a pair on the Oroua River in the Manawatu in 1866, “the first to be recorded” in this country. Stidolph notes that “it was many years before Sir Walter Buller obtained any further specimens and that, “odd birds only had been reported at that period from bothislands (Evening Post, 3 March, 1928).”
However national bird surveys showed that small, isolated populations of grey teal were beginning to establish here from around the 1920’s. The first known grey teal nest was officially recorded on October 1, 1944 at Pike’s Lagoon near Gladstone (Stidolph 1971). By the way, in 2017 they were still there! About 50 grey teal were counted in this area in 1944 though the species still remained listed as “uncommon” in NZ in Jean Delacour's monumental 1956 work Waterfowl of the World.
This all allegedly changed when, according to Harry Frith: “In 1957 there was a drought in Australia and this resulted in a massive influx of grey teal into New Zealand. Since this drought-induced movement, though the numbers have declined, it remains moderately common in New Zealand and probably occupies all the available habitat (Frith 1982).”
Ken Miers is then quoted as saying, “The species seems to have already occupied all suitable habitat, especially since the 1957 invasion. I consider the main reason for the decline since 1958-59 to have been the lack of suitable nesting sites. The nests we find are atypical, 99% of Australian nests are found in trees.”
Jim Mills of the Wildlife Service in 1974, using eight years of banding data, catalogued the increase in grey teal in New Zealand up until then, noting: “It seems unlikely that grey teal numbers are increasing to any marked extent… The New Zealand population may be less than 20,000 (Mills 1976).”
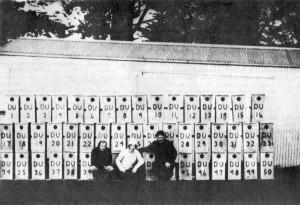
Above: Ducks Unlimited started building grey teal nest boxes like these at sites NZ-wide from 1974 onwards.
Shortly after the creation of Ducks Unlimited (New Zealand) in 1974, the late Jack Worth of Hamilton, then a well-known waterfowl breeder and game bird hunter, suggested that DU erect nesting boxes for grey teal based on the successful American design for Carolina wood ducks.
Plans for these boxes were imported from America and several types trialled. The goal of Ducks Unlimited was outlined by DU Director Neil Hayes in 1977:
“Operation Gretel involves raising the (grey teal) population to 100,000 over a 10-year period by erecting suitable nesting boxes in well-known grey teal areas (Hayes, 1977).”
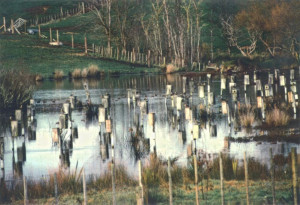
Above: Tony Flexman’s DU teal box complex, Maramarua.
The programme has now passed the 40-year mark and has been spectacularly successful.
To date, at least 4,000 grey teal nest boxes have been put up the length of New Zealand under this initiative, (2,000 by Ducks Unlimited and at least 2,000 by private individuals, hunter-groups, acclimatisation societies and Fish & Game councils).
The national population of grey teal today equals that of shoveler duck, both species likely to be well over the 120,000 mark, the only difference being that grey teal, (Australia’s number one game duck), continues to remain protected in New Zealand while shoveler have always been on the game licence here.
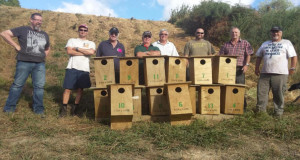
Above: Fish & Game Council volunteers carrying on the good work.
Hunters understandably care best for game bird species which are huntable as game, rather than protected species. No other group has shown any interest in managing or enhancing grey teal. Clearly the best future for grey teal would be to put it on the game bird list – on Schedule 1 of the Wildlife Act.
The decision to then put it on the game bird licence for any Fish & Game region would still need to be backed up with population data to show any proposed harvest would be sustainable. But it could be argued that the birds produced by these nest boxes are, in fact, that surplus – and a very good reason to boost the scheme known as Operation Gretel.
What can you do?

Above: Narrowing the gaps? Australia’s 35,000 duck hunters every year have long grey teal seasons with generous limits - as they always have with this species that numbers 1.1 million there.
Grey teal are the most easily managed duck in New Zealand because of their ready acceptance of nest boxes. Indeed similar experiments with mallards are well under way. Grey teal accept sites such as hollows within pampas grass clumps at ground level.
However they quickly learn to use nest boxes and return year after year to them. In some cases they actually produce two broods in a single year (double-brooding). The male bird is thought to tend the first brood while the hen teal relays and incubates, then looks after the second brood on hatching. This is rare behaviour in a New Zealand duck and another reason why grey teal would sustain a managed harvest.
Best locations for nest boxes

Above: Flooded eggs 2008.
Grey teal nest boxes need to be out over water, they will not use boxes located over land.
We strongly recommend that you don’t mount two or more boxes on the same pole as the ducks will fight each other to protect their territory, sometimes to their death. If possible, mount boxes so they are not visible to other grey teal as this promotes ‘nest-dumping.’ This is when a grey teal hen lays her egs in another nest, which can cause the first teal to abandon it.
All the eggs then rot which makes that nest box useless until it is next serviced. If you have limited room, then mounting boxes in view of each other may be unavoidable, just do the best you can to isolate them if possible.
Nest box height, to avoid flooding, should be as high as you can service them annually, either from a boat or using a ladder and waders. If boxes do get flooded, remove all chilled eggs and saturated contents and start again as soon as you can. After a flood teal will re-nest almost immediately if you give them fresh wood-wool and a clean box.
Best practice nest box dimensions
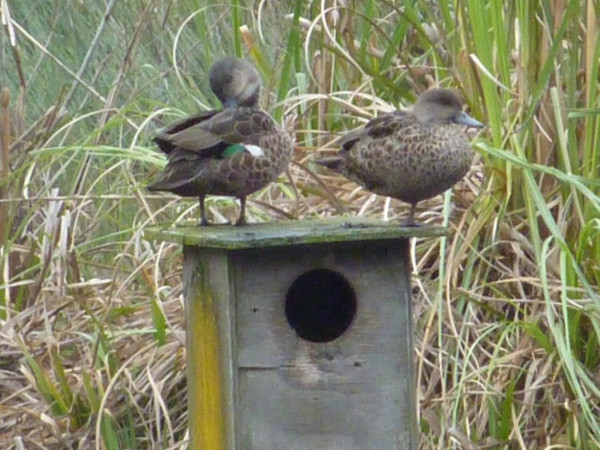
Above: A pair will establish territory before nesting begins.
Treated (H3) 15mm 5-ply (C-D grade is OK), is easiest to assemble. Smaller 9mm ply saves costs but needs to be reinforced along its’ top inner edges with two 20x20mm strips to maintain its square shape.
It can be hard to find treated 20x20mm stakes. They’re not much use if they rot out so persist in finding the right thing, sometimes it will be treated tomato stakes, or consider cutting down larger H3 treated wood to the size you need.
Core box size:
480mm high + lid
245mm wide
297mm deep
Research overseas on wood ducks shows that large nests boxes 25x25x55cm are 4x more productive than small nest boxes, 13.75x25x37.5cm. A similar study of grey teal in NZ would be very useful, but first-hand experience suggests that scrimping on nest box size to produce a square box rather than a deeper one, is not a good trade-off. The smaller boxes leave the hen teal exposed near the opening.
Backing board
600mm deep x 245mm wide
The overhang is at the bottom to allow it to be screwed, lock-wired or bolted to a batten (more about this later).
Sides
265mm wide x 480mm deep
Front board
Note: the edges of the side boards are not visible from the front, but are set behind it.
245mm wide x 480mm high
Entry hole: 95mm dia.
Note 1: A larger hole will allow mallards to nest in this box. Their ducklings cannot climb out and die in it. A smaller hole risks the teal hen having the egg inside her that she’s come to lay crushed, as she forces her way in.
Note 2: The inside of the front board should have a galvanised, square mesh wire ‘ladder’ stapled to it for the teal ducklings to climb out. You can also use a circular saw to put shallow cuts in the board to form a ‘ladder’ they can grip. Don’t worry about how they then get down onto the water, they can jump from any height.
Note 3: Many people make the mistake of adding a landing for the duck outside the entry hole. This just helps predators land and look in. It’s not good practice. Ignore any plans that show ladders for the same reason – they are only needed for a pinioned captive flock. Many people have asked me how the hen teal flies into the nest box hole without such aids. Trust me, she certainly can and does not need any help in this regard.
Base, (sits inside the 4 box-wall sides so that rain doesn’t gain entry here).
210mm wide x 265mm deep
Drill four good sized c.10mm holes, one in each corner, to allow out any rain water. Be sure that nothing projects up from the base such as a screw or nail that might damage any egg that comes into contact with it.
Lid
300mm wide x 350mm deep.
Routed grooves beneath the lid, in from all four edges, will help stop drips running inside the nest box. However this is certainly not essential. There should be a good overhang of lid all around the box to direct rain water away. Teal will sit on these lids in pairs, so the lids should sit flat or nearly so.
Large Project cutting:
Modern CNC cutting machines, if you have access to one, will calculate the most efficient way of cutting teal boxes from ply-sheets, if you are contemplating a large project.
Securing the removable lid
Grey teal do not take nesting material to their nest, so it must be provided for them fresh each year.
To allow for essential annual servicing (for replacing nest material and removing any unhatched eggs), the lid must be able to be removed and replaced. Hinges and similar ideas just add cost and complexity to the project. Instead we use 1.6mm galvanised lock wire which is available in rolls from hardware stores.
The lock wire is installed onto the box end into two drilled holes level and less than 10mm apart on each side of the main box. The wire is inserted into one hole, folded back and drawn through the other then twisted (use square-nosed pliers), to make a firm fit. Leave one long tag-end each side for securing the lid.
This tag end each side then fits through a corresponding hole you’ve drilled in the outer edge of the lid each side. The wire is then bent down to hold the lid firmly on. This is the cheapest and best lid securing method of the many we’ve seen. Galvanised lock-wire lasts much longer than plain wire. Copper wire eventually work hardens but if you’re onto a free source, it has merit. All wire needs to be replaced at some point before it breaks and the lid blows off.
Late March is a good time to service nest boxes and get them ready for the new season, but always take wire/pliers for running repairs at any time of year.
Mounting the box over water
A scaffolding pipe makes a good box mount. Drive it into the wetland using a warratah driver also known as a‘pole-donger.’ Don’t forget your ear-muffs! Usually one scaffolding pipe will make two poles if cut in half, (depending on water depth).
To attach the box to the pipe, the best method in practice has been to take a square fence batten, cut in half, then turn each end down in a wood lathe so that one half (of the half batten), is given a shallow taper. Drive this taper into the already mounted pipe using a wooden mallet, (a wooden mallet shouldn’t split the wooden batten. A steel sledge or a steel hammer is much more likely to do so).
I suggest you temporarily put a nail into the box near the top/centre/rear and hang this nail end over the top of the batten. This will hold the box in place while you put a screw into the batten through a hole you should have pre-drilled in the back of the box. The overhanging nail ensures the box remains steady and the screw going onto the batten is square-on to it while the boat (i.e. your ‘floor’), is moving about underneath you.
Mount the box so that the overhang of the lid when flat on the box sits clear of the top of the batten by 10mm or so. That will help keep the box watertight. A spirit level or even a plumb-bob is very useful to get everything square in the middle of a swamp.
Once things are square, now drill two holes on the nest box backing board near the base, either side of the scaffolding pipe, so you can run some lock-wire through these holes and around the pipe twice. Wind up the two tag ends behind the pipe with square-nosed pliers.
Cut off surplus and push the turned wire flat so it does not catch on anything or anyone. Winding the lock wire up will also snug-up the box to the pipe and make it all secure. Ducks don’t like a box that shakes around too much.
You can also use half-round posts to mount the boxes on.
Numbering nest boxes
It is handy to give the boxes numbers. You can paint these on but a stencil makes a neater job. Cattle ear tags can also be used, just screw them on and they last for years.
If you are catching and banding nesting grey teal, the numbering means you can track which one’s nest twice in the same year, which came back to the same box in subsequent years, which ones you’ve recently banded and so which boxes shouldn’t be disturbed and so on.
You can keep records on an Excel spreadsheet or similar.
Annual servicing
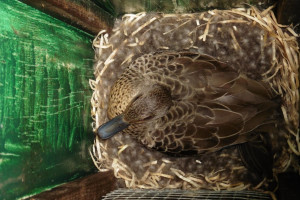
Above: Nothing yet found beats wood-wool as nesting material.
This should be done March when all nesting has supposedly finished. All old nest material must be removed to prevent nest parasites persisting. This is especially so if myna birds or starlings have clogged the box with rubbish.
Any remaining old eggs can, when new eggs are laid and incubated, heat up when incubated, explode and then contaminate and spoil the new eggs, which then perpetuates the cycle. So take out all the old stuff and replace with new.
Ask DOC for a permit to cover you doing this and allow plenty of time for a response.The best nest material is wood-wool, (long, fine wood shavings).
The only wholesale suppliers we know of are:
NZ Woodtex, Herschel St, Ngaruawahia
Woodwool Specialists, Kaiapoi
This bulk product can be costly; but it can be obtained free when it arrives as packaging and is not going to be re-used – especially if you explain that it’s for conservation (take a long the photo of the nesting bird in this article). Crockery shops for example, often use wood-wool as packing. If boxes are not annually serviced, they quickly fill up with myna rubbish and become useless to the ducks.
A box that loses its’ lid is equally useless until it is replaced, so always take spare lids and extra wood-wool. Don’t forget spare lock-wire and pliers too. Entirely avoid using hay or straw as nest material as it will inevitably get wet, rot and produce fungus spores that can kill young ducklings.
If you are hard-pressed for material, then use rushes or cut reeds at a pinch. Dry, dead wheki punga leaves that hang down beside the trunk as well as accumulate below it, are popular with ground nesting ducks and have merit as nesting material inside nest boxes too.
Previous experiments with pine needles and short wood shavings have not been a success. Both grey teal and mallards hands down prefer wood-wool and will weave it into a nest bowl shape. When they begin incubation, they line this with their down feathers.
Pests and predators
Boxes need to be clear of any overhanging branches to keep out rats and possums. Keep in mind that, with a heavy predator on them, branches will hang much lower, so trim them right back. Possums will take up residence and stink the box out. Lying on their back, they’re all claws and teeth to remove. Good luck with that.
Rats are also a problem. They too will take up residence and give away their presence by distinctively puffing up the nest with an obvious entry hole in one corner to get under the nest material. The box will also smell ‘ratty’. Being cunning they often wait while you’ve pulled nearly all the old nesting material out and they’re about to be exposed under it. Then they make their jump for safety. They invariably dive as soon as they hit water.
Rats carry leptospirosis so make sure you and the dog keep up to date with your shots. I have tried various methods to exclude rats, such as smearing nest box poles with lithium grease, which helps, but it is filthy and not fully reliable. Vaseline goes hard and is worse than useless after that. You can also make up an anti-climbing metal cylinder like a possum guard on a power pole, or an inverted metal cone and attach it to the pole. American wood duck nest box plans have drawings of such cones.
Remember that the public will judge these boxes based on their appearance, so a bit of green paint rather than glaring bare metal is good practice. Rats have been known to gnaw through thin aluminium cones to get past them. They sometimes gnaw their way into boxes as well. Metal boxes help keep predators out but heat up too much and the eggs are cooked!
The best practice is to trap and/or poison the adjacent area in advance of nesting time, which starts as soon as the duck season finishes. Also trim back any overhanging trees and spray out any nearby pampas bushes which can be rat havens. When making a new nest boxes be sure to glue any joints with PVA and then clamp them while setting to deny potential spaces to ants.
When a bird has hatched out her brood and left, if ants are still present then remove all nesting material, give the box a good spray with fly-spray and provide fresh wood-wool.
Persistence pays off!
If you go to the effort of putting in grey teal nest boxes, it’s important to maintain them every year, as countless hunter-volunteers have done for the last 40-plus years. Teal do not take nest material to the box so they are relying on you to provide it.
If at first they don’t use your boxes, persist! Once the first nest is laid, usage will quickly build up in the years that follow. At peak usage it’s not unusual for two or three different nests to be laid in each box, each year. Once the local birds fully commit to them their imprinted female offspring will come back as adults the following year.
Banding has shown some grey teal will lay and hatch two clutches in a season. Second grey teal nests also invariably have the same number of eggs as the first, not less. Once again this is rare in NZ. This teal is a very productive little duck.
Permits
If you’re doing anything with eggs in a grey teal nest box complex, you should really have a permit from DOC. That includes throwing away the rotten eggs, removing flooded eggs and removing the odd dead duckling. You will need a separate permit if you want to recover wild eggs, to hatch and hold the ducklings and to release them later. To band ducks you also need to be approved, though grey teal (Z-series) bands are much easier to apply than mallard bands.
Mynas & starlings
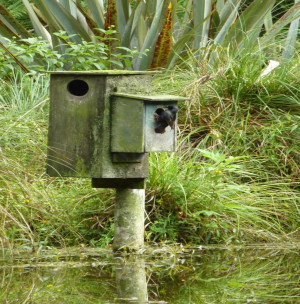
Above: Starlings will adopt the smaller starling-sized nest box and defend the space around both nest boxes from other starlings.
One novel way of limiting starling interference is to build a smaller starling nest box, with starling- sized entry hole, and attach this to the teal nest box. The smaller hole size, (1,3/4”- 45mm), is important as it excludes myna birds. The starling prefers the smaller box so the grey teal is free to use her bigger box.
Myna birds seem to be the more problematic of these two nesting competitors. Research to date shows that myna competition is a problem for nesting grey teal. An internal nest cam showed an Indian myna bird each day trying to pull nesting material up and around grey teal eggs and bury them as they were being laid.
Breeding grey teal
 Above: Field candling eggs of course you should use 2 hands, but this “selfie” shows more detail.
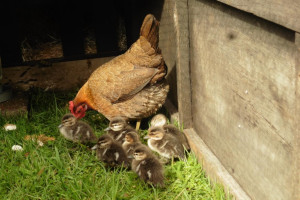
If you have few or no grey teal in your general area and no nests are being made in your new boxes, you can ‘cheat’ by raising and releasing grey teal onto the pond. They are among the easiest of game birds to raise under a small bantam in a coop.
You’ll need to start with eggs and this is where those dump-nests can be handy. If a hen teal is trying to hatch out 20-plus eggs, only half of which are hers, she’s likely to lose the lot as she struggles to keep them all warm under her small frame. So by taking away half and leaving her with the rest, we are doing her a big favour. She’ll happily hatch out the ones left, she can’t count!
Just put the rest under a clucky bantam; a clucky chook is too big and clumsy. In the field put them in an egg carton and then put this in a chilly bin. You’ll need to know if the eggs are being incubated (warm) or not (cold).
It is good practice to hold a couple up to your eyelid to check. This is an old gamekeeper’s trick as eye-lids are one of the more heat-sensitive parts of the body. You can also use your lower wrist and your elbow. When a nest is lined with down, it’s likely it’s being incubated.
If the eggs are ‘hot’ then you’ll need to put a warm hot-water bottle in the bottom of the chilly bin, then a folded towel. Then some wood wool and then the egg carton (keep the eggs away from the direct heat). Pack it with more wood wool so nothing rolls about.
If they eggs rattle in the carton, you can throw in some wheat to steady them. When you get home, just feed the wheat to the chooks. In fact, if the broody bantams are sitting on eggs, wheat and a few chook pellets are ideal as it helps them generate heat.
If the eggs in the nest box are instead cold, or if they will be under a bantam within 30 minutes, then skip the hot-water bottle. If there are no dump nests, you should take all the eggs from a single nest.
What you shouldn’t do is take a few eggs from each of several nests. These will all hatch at different dates and the bantam won’t wait for the rest more than a day once the first ones are out. You will need to field-candle eggs using a bit of radiator hose (25mm INTERNAL diameter works well with grey teal), to make sure their age corresponds roughly to how long the bantam has been sitting (they can sort of count).
She isn’t likely to accept chicks as hers if they turn up just days after she began sitting, so give this bird eggs that you can still see some daylight through using the radiator hose. If she has been sitting several weeks, you are better to supply her with eggs that have gone dark when seen through the radiator hose against the sky, though of course the blunt-top end of the egg should remain clear, (the air-sac).
If you’re introducing incubator-hatched chicks to a bantam that has been sitting several weeks on dummy eggs, then the bantam may kill the new chicks. Be sure to introduce the newly hatched chicks after twilight and by morning they should all be mothered up. Keep things fairly dark and quite while all this bonding is going on.
If you shift them from a hatching box to a coop, then also cover things up somewhat for the first few hours to keep the available light low until everyone settles down. You can use broody Old English Game or silky bantams. Some people have great success raising mallard ducklings with Muscovy ducks which are not only good broodies but also good foster mothers.
However the Muscovy reportedly needs to lay her own eggs first to go broody. Not so with the bantams; just leave some nests of plastic eggs or infertile bantam eggs around for the latter to find and they’ll adopt them. When they get all protective when you put your hands under them, you can replace these false eggs with the grey teal ones to hatch.
Until then keep the ‘cold’ teal eggs in a cool place (not the fridge!), and turn each egg each day, (45 degrees one day then the opposite 45 degrees the next). Exchange them on dusk and the bantam is much less likely to notice any colour or size differences and will settle down with them. ‘Hot’ eggs needs to be kept warm, so you need a clucky bantam on standby.
When they’ve hatched
 Above:These grey teal chicks are just days old.
Make sure they newly hatched chicks get a mixture of hard-boiled egg yolk (simmered for 20 minutes), pushed through a fine mesh sieve and then sprinkle this with finely chopped yarrow leaves (use only the white or pink flowered European variety). This herb is described as an “indispensable” appetite stimulant.
Do this once or twice a day for three days while weaning them onto a high-protein fine poultry crumble such as ‘Meat Bird’ crumble or, less suitable is ‘Chick Starter.’ Start putting a layer of crumble under the egg/yarrow mix on day two and they’ll soon be into the crumble as well. Quickly discontinue the egg/yarrow after three days, its job is done. If you don’t, they may eat nothing else.
If you’re sure it hasn’t been sprayed and the water is fairly fresh, ducklings also love a meal of floating duckweed and/or red water fern) as they get older. They may need a ramp up to the water container. Mallard and teal ducklings also love garden snails.
When they are first introduced to water, make sure it’s shallow and there are some stones to help them climb out. Keep an eye on them to make sure they get in and out okay. Once established in an area, successive grey teal generations will stay as long as you do your part by annually servicing the local nest boxes.
In areas where there are already grey teal, you won’t need to breed them to get them started, however these ducklings do make a wonderful biology lesson for kids to stimulate their interest in wildlife.
Research

Above: Everyone knows grey teal in NZ are a game bird in waiting. Why pretend otherwise?
Currently grey teal receive no DOC priority as a Schedule 3 Species; no monitoring, research, or propagation.
That’s because our cash-strapped conservation department has far more pressing conservation priorities involving our critically endangered native species.
That’s unlikely to ever change so it would be common sense to transition grey teal to Schedule 1, to make them a game bird species for Fish & Game to manage.
Banding
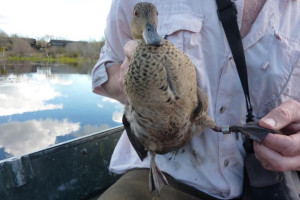
Above: Banding/weighing/counting & recording egg numbers is easy as grey teal soon return to their nest.
Grey teal are incredibly easy to band because of their nest box use. Moderate human handling does not cause them to abandon their eggs. Simply sneak up to their box while not making too much noise with the oars and then cover the entrance or block it with an old sock. Reach in and carefully catch and remove the duck. You can even run the outboard while going from box to box.
You will miss a few initially, but after a while you’ll learn what works best. Grey teal, male and female, can also be captured in much larger numbers away from nest boxes in Lilly-pad type traps baited with wheat. Entrances need to be smaller to exclude mallards.
Newer lightweight transmitter tracking technologies means we can now follow this highly-mobile species as they fly the length of New Zealand to learn more about the causes for their extensive and mysterious movements. Grey teal have suitable populations a short drive from many of our main universities and are a natural for such research.
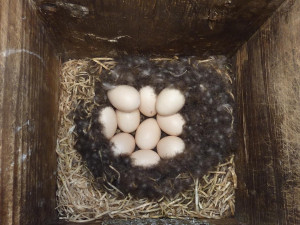
Above: Grey teal eggs in the nest.
All eggs are porous and have thousands of tiny holes in them, so they readily absorb contaminants for instance when lying on mud. Unlike black swan, nesting grey teal frequently defecate on their eggs if disturbed. This liquid is not to be compared to their usual mild faeces, but is a bacteria rich liquid brew that has been described, for overseas eider ducks as “a frightful odour that will deter the hungriest dog.”
This same nest-fouling behaviour has also been reported in other duck species such as blue-winged teal, (Bennett 1938), mallards, (Kear 1963), and wood duck, (Bellrose and Holm, 1994), but not yet to my knowledge grey teal. This nest fouling odour has been shown by researchers to deter mammalian predators such as Norway rats, foxes and ferrets, as well as crows who refused to eat eggs contaminated with even relatively small amounts of this liquid.
Teal boxes often have rotten eggs in them also and this smell can permeate nesting materials as can “bangers” that go off in the sun. It is not unusual to get this excreta on clothing when catching wild grey teal to band in nest boxes.
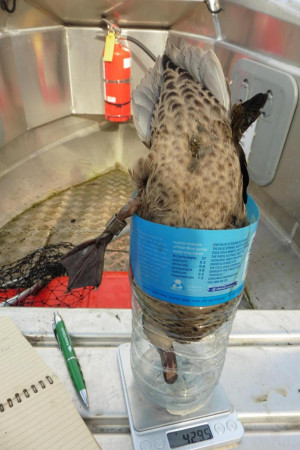 Above: Using a bottle to temporarily weigh grey teal at banding, be sure to drill extra breathing holes in the base.
It will certainly contaminate bags used to hold grey teal for weighing with Pesola scales. However they can also be held for weighing in recycled 1.5 litre plastic bottles with one end cut out and weighed on electronic scales, the advantage being that the bottle can easily be washed after each use on site.
A soak overnight for the weighing bag in Napisan Oxy-action solution followed by a washing cycle with ordinary cold-water washing powder and UV exposure (i.e. drying on a line), will have the white weighing bag as good as new again. The smell on grey teal eggs is strong and persistent though bantams don’t seem to mind it.
It would be possible to wash these eggs using heated proprietary egg sanitising solutions, but that would add cost and complexity to field-recovery of wild eggs. There are strict laws around supplying wild foods to the New Zealand public and both the processing premises and the suppliers used would all need to meet the strict requirements of the Animal Products Act 1999 even if these eggs or meat are being given away.
By John Dyer, Auckland/Waikato Fish & Game Northern Game Bird Manager